Come behind the scenes to see what's involved in a photography shoot from start to finish...
Have you ever wondered what's actually involved in a product photography shoot? Or how long it takes to put a shoot together? You might be thinking it's time to invest in your business and book yourself in for a shoot, but you don't know what's involved or how the process works. You're not sure what you're getting for your money and you may even be fooled for thinking it's easy, just point and shoot right!
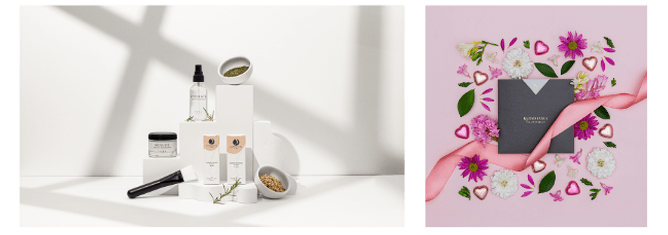
BUT, there is A LOT that goes on behind the scenes to create the beautiful images you see on social media, websites, billboards and magazines.
It's pretty safe to assume the time and work involved is more than you think! To give you a rough idea - one image may take 30-45min to setup and test the lighting, arrange the props and products, then shooting may take up to 15 mins to ensure the set, lighting and shoot angles work. Once that process is complete, it can be 45min-2 hours in post production editing just the one image, and this isn't including the initial time it takes to create the concept, purchase and/or make props for the image. Now imagine doing a 20 image shoot, you can see how the time and work adds up very quickly.
When hiring a product photographer, you are often also hiring a stylist, creative director, lighting pro, prop maker and editor who has a library of specialist equipment and software. It's important to take this into account when booking in a shoot. If you had to hire different people to fill these roles, costs would add up in no time.
My process involves 3 main steps:
Pre-Production, Shoot Production and Post-Production
Once initial contact has been made, your first step is to fill out my creative brief (check out the brief here to give you an idea). This is where I get all the details about your business, brand, products, brand guidelines, the vibe of the shoot, how many assets you require, inspiration images you love... everything I need to know to provide you with an accurate quote and proposal.
Once the proposal is accepted and the deposit is paid, pre-production begins.
PRE PRODUCTION
The pre-production process is where the research and brainstorming begins. I may ask for more information at this stage if required.
I look at your creative brief in depth and brainstorm ideas for your shoot. I think about colours, textures, type of lighting, angles, props that may be required, what story are we telling and what feelings do we want the images to convey. I look at the inspiration images you have provided and pull elements of these images into my planning to create a vibe that works for your brand.
I then put together a shoot plan using Milanote for your approval before going ahead with your shoot. This shoot plan outlines each shot along with reference images, product/s to be featured, notes on backgrounds and props that will be used and lighting style. It also includes details of the shoot date/s, deliverables, props required and any important notes.
Once the shoot plan is complete I send it through to you for any feedback and/or notes. You can comment directly on the board and let me know if any changes are required. Once the plan is approved I begin my prop sourcing/making and order any custom backdrops that may be needed.
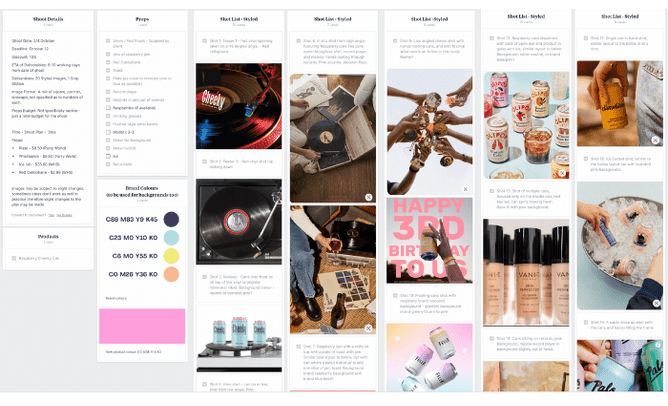
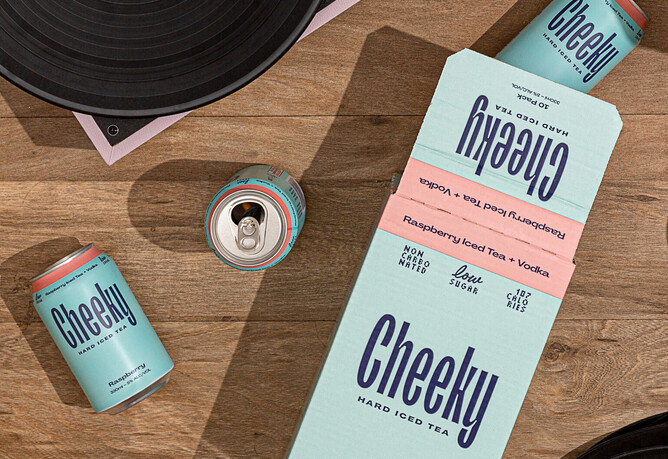
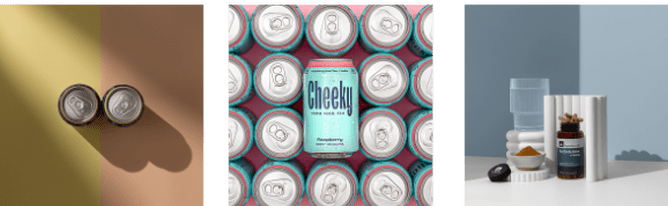
Example of a shoot plan for Cheeky Iced Tea Co in Milanote.
SHOOT PRODUCTION
Next up is shoot production, this may take place over one day, two days, or several days depending on how many assets are required for the shoot.
These shoot days consist of firstly allowing time to get the products and equipment needed out. I also clean the products to ensure there are no fingerprints, dirty marks etc. This can take awhile but it's important to have everything organised and easily accessible.
Once all setup I pull up the plan on my computer and begin working through the shot list ticking off each shot as I go so I know where I am at. I don't necessarily shoot in order as some shots may have the same backdrops, props or lighting so I tend to shoot the these in groups as it's more efficient.
POST PRODUCTION
Lastly is the post-production process. I use Lightroom to organise and select the final images and for basic editing, I then bring each image in to Photoshop to do more advanced editing. Advanced editing involves cleaning up backgrounds, removing any marks, spillages, rigs, bluetack etc, anything that shouldn't be there, colour correcting, sharpening, background replacement if required, colour enhancing, resizing, dodging and burning elements of the image to name a few.
Some of the more complex images that have a lot going on and/or multiple products may involve focus stacking which is compositing two or more images together to ensure all parts are in focus. This editing process can take 45min-2 hours per image.
Once the images are fully edited and ready to go they are uploaded into a personal client gallery where you can download the images at both high resolution and web resolution.
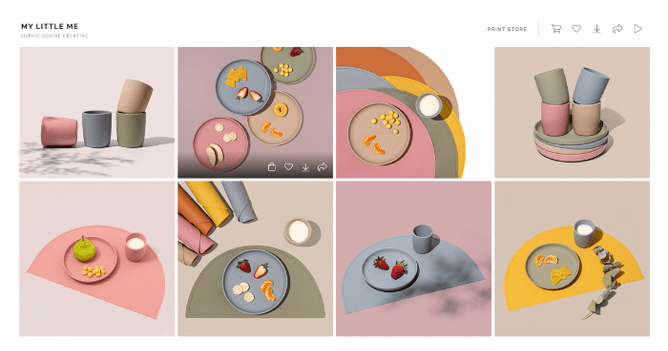
Example of client gallery - My Little Me
As you can see there is a lot involved in the process of creating beautiful product images that stop the scroll! Luckily for me (and you) it's a process I enjoy and I love being able to call this my job.
I hope this has given you some insight into the amount of work, time and creativity involved in pulling together a product photography shoot.
If you're ready to take the next step and invest in your business you can get started by booking a free discovery call to chat, email me or fill out my creative brief.
Chat soon,
Sophie (& Alfie)